
This tutorial was written on Windows 10 using WSL with an O3DE version that
was built from source, on commit e2c4c0e5e3
In the previous article we scripted paddle motion.
In this article we are going to be writing the scripts that make the ball move and keeping track of the score.
Creating a Rigidbody Pong Ball
Find the pong ball in the Entity Outliner and select it. Then using the Entity Inspector
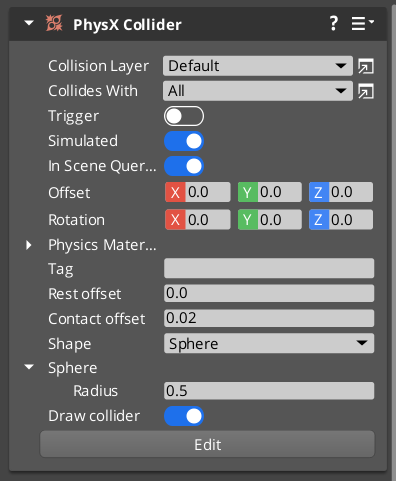
we need to add two components. First we need a PhysX Collider just like our walls.
This will describe the collision volume our ball will use. As you might expect, we want to
set the Shape to Sphere and properly configure the Radius.
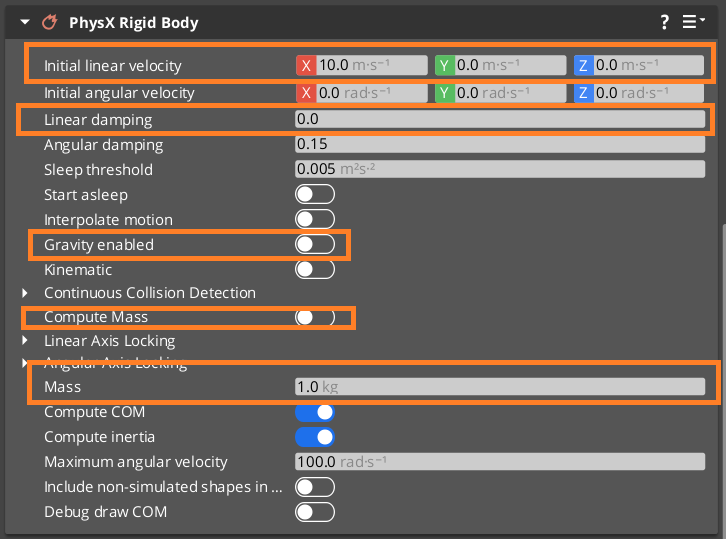
We will also want to add a PhysX Rigid Body component. As described in the
previous article, this will allow the PhysX simulation
to take complete control over the movement of our ball. We will only be able to
influence it by applying forces to it and letting the simulation handle the reactions.
This component requires a little more configuration:
Initial Linear Velocitylets give it a little push in the x direction just to see it move for now.Linear Dampeningwe want that classing pong ball feel, which means we dont want to be bothered with things like friction or air resistance, our pong ball shouldn't slow down!Gravity Enabledwe don't want our ball to be affected by gravity.Compute Masswe dont want the physics system to guess what our Mass should be.Masswe should customize our mass to get the kind of movement we want. I put1.0- because it made me happy.
 |
 |
If we start the game we should see something like this:
Hey! I thought the ball wasn't supposed to slow down!
The reason the ball is losing momentum is because each time it collides with something,
some of its speed is lost. To change this, we need to look at Physics Materials.
Physics Materials
Just like how rendering materials affect how an object is handled by the rendering system, a physics material helps us describe how our object should be handled by the physics system. When two objects collide, their physics materials (as well as rigid body settings) help PhysX figure out what should happen.
We want to adjust the ball's physics material to make it as bouncy as possible.
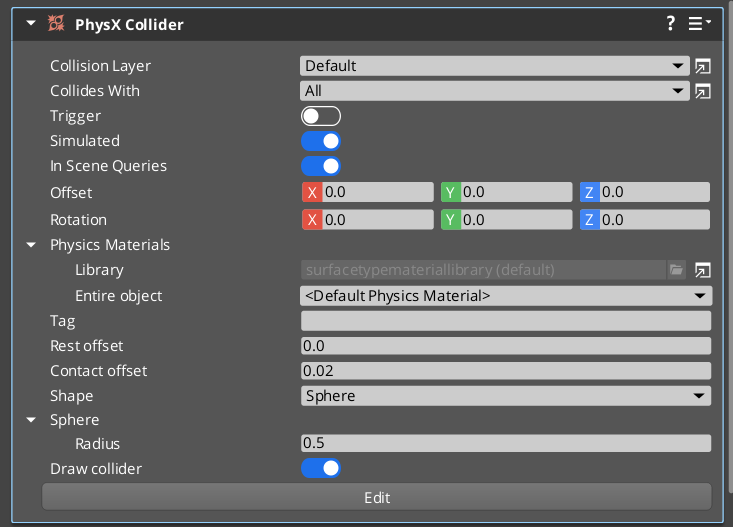
From the PhysX Collider component on the ball, expand the Physics Materials
property, and use the provided shortcut to open the Asset Editor. This will
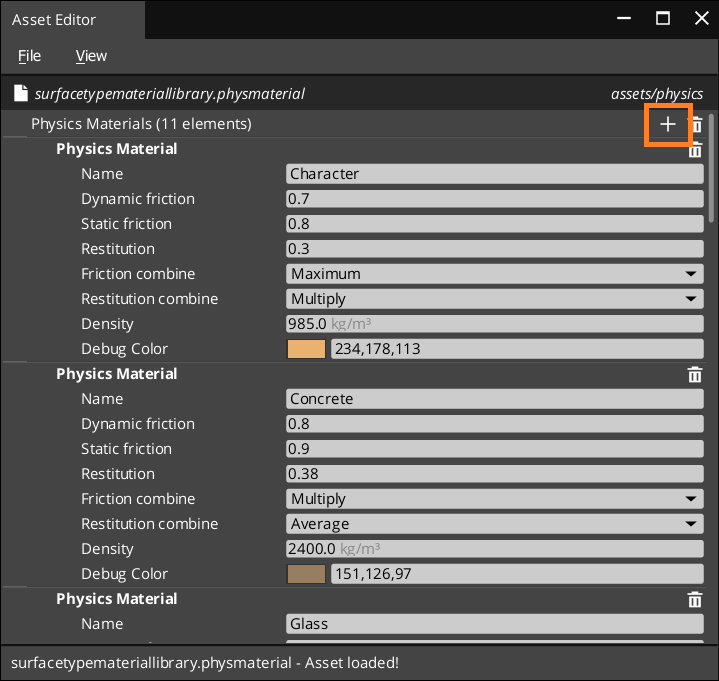
display all the Physics Materials currently available. Use the + button to add
a new material, and scroll to the bottom of the list where it was added. Change
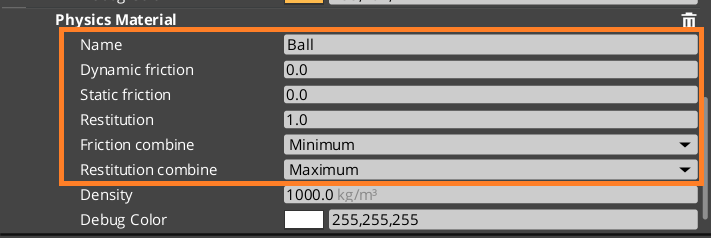
the name to Ball, and then set the following properties:
Dynamic / Static Frictionshould both be 0. This will prevent it from slowing down.Restitutionis how bouncy our ball is. Crank that up to 1.0 (max).Friction and Restitution Combinelets us control what happens when two physics objects collide. We selectMinimumfor friction - meaning we want to take the friction value that is the LEAST of the two collision objects. AndMaximumfor restitution, meaning we take the biggest bounce.
 |
 |
Much Better!
Start Moving After Start Screen
Rather than our ball moving right away by using that initial velocity, lets
wait until we receive the GameStartEvent. Create a new Scripts/BallMovement.lua
script, and - like our paddles - have it subscribe to the GameStartEvent. When
it receives the message, use the RigidBodyRequestBus to give it a little push
via ApplyLinearImpulse
 1
 2 --
 3 -- Properties #################################################################
 4 --
 5 local BallMovement = {
 6     Properties = {
 7         BallSpeed = 1.0,
 8         Player1Goal = EntityId(),
 9         Player2Goal = EntityId(),
10     }
11 }
12
13 GameStateEvents = require('scripts.gamestateevents');
14
15 --
16 -- Lifecycle ##################################################################
17 --
18
19 function BallMovement:OnActivate()
20     self._moveDir = 0;
21     self._gameStarted = false;
22
23     -- connect to the script event `GameStateEvents` to receive the game start event
24     self.GameplayNotificationBus = GameStateEvents.GameStart.Connect(self);
25 end
26
27 --
28 -- ----------------------------------------------------------------------------
29 --
30
31 function BallMovement:OnEventBegin(e)
32     if e == GameStateEvents.GameStart.Name then
33         self._gameStarted = true;
34         RigidBodyRequestBus.Event.ApplyLinearImpulse(self.entityId, Vector3(10, 0, 0));
35     end
36 end
37
38 --
39 -- ----------------------------------------------------------------------------
40 --
41
42 function BallMovement:OnDeactivate()
43     -- disconnect from busses we connected to.
44     self.GameplayNotificationBus:Disconnect();
45     self.CollisionEvent:Disconnect();
46 end
47
48 --
49 -- ############################################################################
50 --
51
52 return BallMovement;
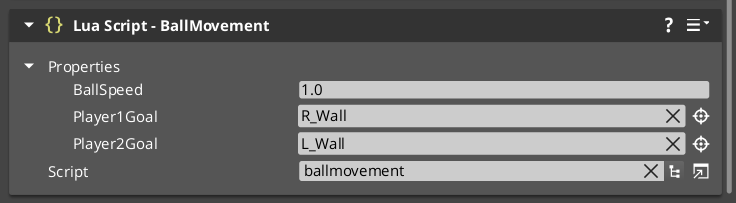
Add this script to your ball and remove the Initial Linear Velocity.
Scoring Points
Now that we have a ball that bounces and hits things we need it to tell us when
it hits one of the walls behind the paddles so we can score points. To do this,
we need to get a callback for whenever the ball's rigidbody collides with something.
Then we can check whether or not that the object the ball hit was one of the walls
that scores. We'll need two properties on the BallMovement.lua script so we can
tell it the entityIds for the walls we want to act as goal areas.
To register a callback we need to use SimulatedBody.GetOnCollisionBeginEvent.
A SimulatedBody is sort of the base class of physics objects. Our RigidBody
is a SimulatedBody and so is the character component we put on the paddles.
Now, collision events are a little different from the EBus stuff we've done so far.
Collision events use the AZ::Event system, which is kind of like a lightweight
EBus. You can read more about it in the official Lumberyard documentation
After getting th event from the SimulatedBody, we can call the Connect method
on it, which takes a function for our callback. We could just pass one of our
class methods, but we want to make sure when the function is called it has self
properly bound. To do this, we wrap the call in a small lambda. (This may not
be idiomatic Lua, I'm still learning.)
The callback gives us two parameters but we are interested in the second - the
CollisionEvent. From that we can get several intersting bits of information,
including the EntityIds involved in the collision. We are going to be body1,
so we ask about body2 using collision:GetBody2EntityId() and compare this with
the known entityIds of the scoring walls. For now lets just print out a mesasge
when a point is scored.
Here's what this looks like all together:
 1
 2 --
 3 -- Properties #################################################################
 4 --
 5 local BallMovement = {
 6     Properties = {
 7         BallSpeed = 1.0,
 8         Player1Goal = EntityId(),
 9         Player2Goal = EntityId(),
10     }
11 }
12
13 GameStateEvents = require('scripts.gamestateevents');
14
15 --
16 -- Lifecycle ##################################################################
17 --
18
19 function BallMovement:OnActivate()
20     self._moveDir = 0;
21     self._gameStarted = false;
22
23     -- connect to the script event `GameStateEvents` to receive the game start event
24     self.GameplayNotificationBus = GameStateEvents.GameStart.Connect(self);
25
26     -- Get the collision event so we can connect to it.
27     local event = SimulatedBody.GetOnCollisionBeginEvent(self.entityId);
28
29     -- forward the event to our class handler, making sure that self is properly
30     -- passed.
31     self.CollisionEvent = event:Connect(
32         function(_, collision)
33             self:OnCollisionBegin(collision)
34         end
35     );
36 end
37
38 --
39 -- ----------------------------------------------------------------------------
40 --
41
42 function BallMovement:OnCollisionBegin(collision)
43     otherId = collision:GetBody2EntityId();
44     if otherId == self.Properties.Player1Goal then
45         Debug.Log("Player 1 Scored a Point")
46     elseif otherId == self.Properties.Player2Goal then
47         Debug.Log("Player 2 Scored a Point")
48     end
49 end
50
51 --
52 -- ----------------------------------------------------------------------------
53 --
54
55 function BallMovement:OnEventBegin(e)
56     if e == GameStateEvents.GameStart.Name then
57         self._gameStarted = true;
58         RigidBodyRequestBus.Event.ApplyLinearImpulse(self.entityId, Vector3(10, 0, 0));
59     end
60 end
61
62 --
63 -- ----------------------------------------------------------------------------
64 --
65
66 function BallMovement:OnDeactivate()
67     -- disconnect from busses we connected to.
68     self.GameplayNotificationBus:Disconnect();
69     self.CollisionEvent:Disconnect();
70 end
71
72 --
73 -- ############################################################################
74 --
75
76 return BallMovement;
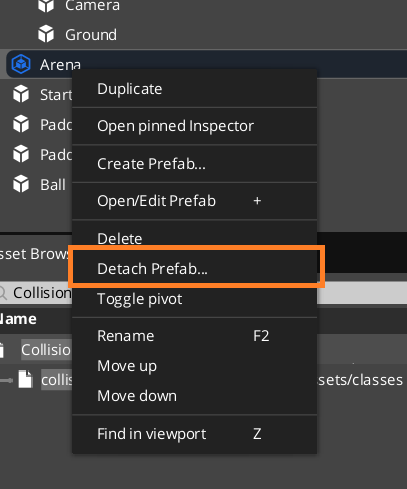
We are going to need to set the EntityIds on the new component. In order to do that though, I had to break the Arena prefab ;_; There's probably a way I don't know to fix that but...
 |
 |
Bounce Angle
Before we start building out the scoring system, lets get the pong paddles to behave more pong-y. It's not very realistic physics wise, but it is a lot of fun. There are a few properties to consider:
- If you hit the ball with the center of your paddle, you bounce it straigth.
- If you hit the ball wit hthe edge of your paddle, you bounce it at a steep angle away from your center.
- The further from the edge you hit with your paddle, the faster the ball goes.
Also, remember that we turned off all friction or slowing down of our ball. We need to be careful not to continually ADD speed, or at least have some way to take it away.
We are also going to need to know the EntityIds of our paddles, since we want
to change the collision response. Here's what I came up with:
--
-- Properties #################################################################
--
local BallMovement = {
    Properties = {
        BallSpeed = 1.0,
        Player1 = EntityId(),
        Player2 = EntityId(),
        Player1Goal = EntityId(),
        Player2Goal = EntityId(),
    }
}

GameStateEvents = require('scripts.gamestateevents');

--
-- Lifecycle ##################################################################
--

function BallMovement:OnActivate()
    self._moveDir = 0;
    self._gameStarted = false;

    -- connect to the script event `GameStateEvents` to receive the game start event
    self.GameplayNotificationBus = GameStateEvents.GameStart.Connect(self);

    -- Get the collision event so we can connect to it.
    local event = SimulatedBody.GetOnCollisionBeginEvent(self.entityId);

    -- forward the event to our class handler, making sure that self is properly
    -- passed.
    self.CollisionEvent = event:Connect(
        function(_, collision)
            self:OnCollisionBegin(collision)
        end
    );
end

--
-- ----------------------------------------------------------------------------
--

function BallMovement:OnCollisionBegin(collision)
    otherId = collision:GetBody2EntityId();

    -- get the position of us and the thing we hit
    -- we don't want to add any forces in the z direction, so zero those out
    -- here (that way we don't shoot the ball up and out of the arena, for example.
    local myPos = TransformBus.Event.GetWorldTranslation(self.entityId);
    myPos.z = 0;

    local theirPos = TransformBus.Event.GetWorldTranslation(otherId);
    theirPos.z = 0;

    -- get the vector that points away from the direction we are hitting the paddle
    local deltaDir = myPos - theirPos;

    -- get the normalized and length, we'll use these to adjust the speed
    local awayDir = Vector3.GetNormalized(deltaDir);
    local dist = Vector3.GetLength(deltaDir);

    -- get our current velocity and speed
    local velocity = RigidBodyRequestBus.Event.GetLinearVelocity(self.entityId);
    local speed = Vector3.GetLength(velocity);

    -- our new speed should be a fraction of our current speed * how far away
    -- from the center of the paddle we hit.
    local newSpeed = speed * 0.5 * (1.0 + dist);

    -- if we hit a paddle, set our velocity to our new speed in the new direction
    if otherId == self.Properties.Player1 or otherId == self.Properties.Player2 then
        RigidBodyRequestBus.Event.SetLinearVelocity(self.entityId, awayDir * newSpeed);

    -- otherwise check if we scored any points
    elseif otherId == self.Properties.Player1Goal then
        Debug.Log("Player 1 Scored a Point")
    elseif otherId == self.Properties.Player2Goal then
        Debug.Log("Player 2 Scored a Point")
    end
end

--
-- ----------------------------------------------------------------------------
--

function BallMovement:OnEventBegin(e)
    if e == GameStateEvents.GameStart.Name then
        self._gameStarted = true;
        RigidBodyRequestBus.Event.ApplyLinearImpulse(self.entityId, Vector3(50, 0, 0));
    end
end

--
-- ----------------------------------------------------------------------------
--

function BallMovement:OnDeactivate()
    -- disconnect from busses we connected to.
    self.GameplayNotificationBus:Disconnect();
    self.CollisionEvent:Disconnect();
end

--
-- ############################################################################
--

return BallMovement;
This formula has some magic values, you can probably parametarize it, or even come up with your own solution.
Controlling the Second Paddle
For me, the most fun thing was to add another PaddleMovement component to it,
but invert the speed (set it to -10). So it moves in the opposite direction
as the first paddle, then play by myself. You could also add more keybindings
and have another set of keys (Liek the arrow keys or I and K) control it.
At this point the world is your oyster!
Conclusion
Make sure to save your work with Ctrl+S or File | Save
There is till a lot of polish and some more things we could do to make this more
pong-like (and more like the original official video series), however for me I
feel like I've gotten as much as I can out of this conversion, so I'll probably
leave it here. If you want to see more you can always yell at me by sending
an email to contact {at} letsmake.games and tell me what you want me to do.